背景
在 unity 开发的技术栈中,服务器 – 客户端的网络同步方案有三种方案:Unity 官方的 Netcode,以及第三方方案:Mirror 或者 Photon。在前两者的网络架构中,会比较容易地构建出来直连的网络模式。但是在 Photon 的世界中,事情变得比较有趣。
在 Photon fusion 的架构中,Photon cloud 提供了全球低延迟的服务器部署方案。它包括一个可能动态刷新的 Name Server,每个区域的 Master Server 以及 Game Server。 客户端连接服务器的逻辑如下:
- 客户端通过 Name Server 获取全球可用区。
- 客户端通过最低延迟找到对应的 Master Server, 这个服务主要提供匹配以及房间服务。
- 客户端加入 Game Server 中的房间。
注意:目前 Phton fusion 已经到了第二个版本,也是本文的主要版本。
挑战
Amazon GameLift 是专门为专用服务器打造的全球化部署方案,它提供了 EC2 Managed、Container、FleetIQ,以及 Anywhere 等多种灵活的方案,使得不同的游戏环境下都能迅速方便地接入 Game Server 游戏。通常情况下,Game Server 中的房间通过 ip + port 的方式直接暴露给 Client。但是在 Photon fusion 中,每次连接都需要指定 Name Server 和 Master Server。尤其是 Master Server,它通过区域中的 Game Session Name 来唯一识别 Game Server 中的房间,Client 没有 IP + port 的信息了。在这种情况下,Amazon GameLift 是否还能适配?
架构
通常来说我们会把专用服务器的数据交换分成两路:
- UDP:用于进行位置状态同步,以及预测回滚这类操作,对于延迟性要求很高。
- TCP:主要是一般性数据交换,比如游戏内消息,语音等等,这部分对于延迟要求不高。
Photon 引入了 Cloud 模块,除了用作 relay 服务器外,它还会做一些玩家在线数之类的统计,并且你超过了 100 人后,就需要开启付费版本了。
实现步骤
接下来我们将一步一步的实现上述的架构!
准备
Unity
需要的版本为 Unity 2021.3.18 or later, 2022.3.x, or 2023.x,如果 Unity 的版本过低,可以去 Unity Hub 进行升级。
Tutorial Game:为了更方便地说明,这里我们参考了 https://doc.photonengine.com/fusion/current/tutorials/host-mode-basics/overview。这个场景十分简单,一个平面上,玩家扮演胶囊体互相射击。
Photon Fusion
Region:photon cloud game server 支持的区域列表如下,我们在部署的时候,需要确保 AWS 的 Region 和 photon cloud 的 code 匹配。比如用 aws us-east-1 来匹配 photon us。当然,如果不指定的话,Photon 会通过最低 ping 来设置就近的 Region。
拓扑图
针对网络同步,我们需要搞清楚自己的网络拓扑结构是哪种。在 Photon 中通常来说会有四种模式:
- 专用服务器(Dedicated Server) – photon fusion
- 服务器负责所有的关键权限的管理,客户端和服务器之间通过 Replication 和 RPC 方式进行属性同步。不容易作弊。
- 客户端托管(Client Host) – photon fusion
- 某个客户端会拥有主要的权限,会要求客户端性能比较好,容易作弊。
- 权限共享(SHARED) – photon fusion
- 确定性贞同步(Deterministic) – photon Quantum
- 基于 Unity 的 ECS 那套做的高效同步框架, 其架构为 P2P 的,中间可以加入 replay 服务器。
目前能够和 Gamelift 集成起来的是前面三种。
SDKs:Phonton Fusion 分为 Stable Sdk 以及 Addon Sdk(物理同步、状态机和兴趣管理等)。
对于测试项目我们只需要下载 Stable SDK 即可。
下载后,需要在 unity 打开的情况下双击 sdk,完成安装。
Game AppId:创建一个 Photon Dashboard 账号,然后创建一个 Multiplayer Game 的应用,应用类型为 photon fusion 版本 2,然后获取其 AppId。获取到 AppId 后你可以直接在 Hub 中设置,或者在 AppSetting 中设置。不过笔者会推荐用代码形式来提高可控性。参考代码如下:
private FusionAppSettings BuildCustomAppSetting(string region, string customAppID = null, string appVersion = "2.0.0")
{
    var appSettings = PhotonAppSettings.Global.AppSettings.GetCopy(); ;

    appSettings.UseNameServer = true;
    appSettings.AppVersion = appVersion;

    if (string.IsNullOrEmpty(customAppID) == false)
    {
        appSettings.AppIdFusion = customAppID;
    }

    if (string.IsNullOrEmpty(region) == false)
    {
        appSettings.FixedRegion = region.ToLower();
    }

    // If the Region is set to China (CN),
    // the Name Server will be automatically changed to the right one
    // appSettings.Server = "ns.photonengine.cn";
    return appSettings;
}
GameLift Servers
SDK
根据 https://github.com/aws/amazon-gamelift-plugin-unity 中的步骤,我们需要下载两个 SDK:
- Amazon GameLift Plugin for Unity.
- Amazon GameLift C# Server SDK for Unity plugin (aka. lightweight Unity plugin).
针对 Managed EC2, Anywhere 等测试场景,需要集成 GameLift SDKs,具体代码可以参考 https://docs.aws.amazon.com/gamelift/latest/developerguide/integration-engines-unity-using.html。
注意:如果我们只需要 game server sdk,在 sdk4 repo 中提供了直接打包 dll 的脚本,在 sdk5 中可以下载源码,自己编译即可。
在 Anywhere (sdk5) 场景中,需要传递 ServerParameters 调用 InitSDK
//Server parameters are required for an Amazon GameLift Servers Anywhere fleet.
    //They are not required for an Amazon GameLift Servers managed EC2 fleet.
    ServerParameters serverParameters = new ServerParameters(
        webSocketUrl,
        processId,
        hostId,
        fleetId,
        authToken);
    //InitSDK establishes a local connection with an Amazon GameLift Servers agent
    //to enable further communication.
    initSDKOutcome = GameLiftServerAPI.InitSDK(serverParameters);
在 Managed EC2 中,不需要传递 ServerParamters
initSDKOutcome = GameLiftServerAPI.InitSDK();
请求交互图
下图是一个笔者整理出来的 GameLift Servers 与 Photon Cloud 的交互图。
可以看到,整个流程分成几个部分
- 初始化游戏服务器
- 创建游戏会话
- 添加玩家到游戏内
- 玩家离开会话
- 关闭游戏会话
接下来我们将讲解每个部分的集成方法
初始化游戏服务器
这个步骤和 GameLift 原始的交互流程一直,主要是实现 InitSDK 和 HealthCheck 的方法。
创建游戏会话
在这一步中,我们需要游戏服务器在 InitSDK 的回调方法 OnStartGameSession 中去 PhotonCloud 那边注册房间的信息 SessionName。
服务器入口:StartFusion方法
首先要搞清楚在 Dedicated Server 中,去设置对应的游戏模式:
- GameMode.Host: 包括服务器和一个客户端
- GameMode.Server:只有服务器,接受链接
- GameMode.Client:只有客户端
定义一个 StartFusion 方法,需要根据现在是哪种 GameMode,来调用 StartGame 的方法
private void StartFusion(GameSession gameSession)
  {
    Debug.Log(Thread.CurrentThread.ManagedThreadId == 1);
    Debug.Log(SynchronizationContext.Current != null);

    var gameSessionName = $"TestGameRoom{UnityEngine.Random.Range(0, 10000)}";
    var connState = new ConnectionState();
    connState.gamesession = gameSession;
    connState.sessionName = gameSessionName;

    if (_isDedicatedServer)
    {
      Debug.Log($"gameSessionName: {gameSessionName} SERVER");
      _photonManager.StartGame(GameMode.Server, connState);
    }
    else if (_isDedicatedHost)
    {
      Debug.Log($"gameSessionName: {gameSessionName} HOST");
      _photonManager.StartGame(GameMode.Host, connState);
    }
    else
    {
      Debug.Log($"gameSessionName: {gameSessionName} CLIENT");
    }
  }
在 GameLift 的 ProcessParameters 的 OnStartGameSession 回调函数中去 StartFusion。这里要注意 photon fusion 的网络同步必须在主线程执行,因此我们采用了 SynchronizationContext Post 的方法去调用。
//Implement OnStartGameSession callback
  private void OnStartGameSession(GameSession gameSession)
  {
    //Amazon GameLift Servers sends a game session activation request to the game server
    //with game session object containing game properties and other settings.
    //Here is where a game server takes action based on the game session object.
    //When the game server is ready to receive incoming player connections,
    //it invokes the server SDK call ActivateGameSession().

    var outcome = GameLiftServerAPI.ActivateGameSession();
    if (!outcome.Success)
    {
      Debug.LogError($"OnStartGameSession Failed: {outcome.Error.ErrorMessage}");
    }
    else
    {
      Debug.Log($"OnStartGameSession Success");
      _unityContext.Post(state => {
        StartFusion(state as GameSession);
      }, gameSession);
    }
  }
接下来,可以看到我们通过 ConnectState 这个对象将 gamesession 的 ipAddress 和 port 从 gamelift 传递到了 photon。
那么在 CustomPublicAddress 中绑定这个地址和端口即可。这样 photonCloud 就可以通过 sessionName 找到服务器了。同理,我们还可以把一些 gamesession 的自定义信息也带过来。
public async void StartGame(GameMode mode, ConnectionState state)
  {
    Debug.Log($"GameMode: {mode}");

    try
    {

      GameSession gamesession = state.gamesession;
      string SessionName = state.sessionName;
      string gameAddress = state.gameAddress;
      ushort gameport = state.gamePort;

      // other logic
      var appSettings = BuildCustomAppSetting("<photon-region-code>", "<photon-custom-appid>");

      StartGameResult result;
      if (mode == GameMode.Client)
      {
        // CLIENT: Start or join (depends on gamemode) a session with a specific name
        // CLIENT LOGIC
      }
      else
      {
        // SERVER: get game session info
        if (gamesession != null)
        {
          gameAddress = gamesession.IpAddress;
          gameport = (ushort)gamesession.Port;
          var maxPlayers = gamesession.MaximumPlayerSessionCount;
          var gameProperties = gamesession.GameProperties;
          gameProperties.TryGetValue("SessionName", out SessionName);
          Debug.Log($"maxPlayers: {maxPlayers}");
        }
        Debug.Log($"STATE: SessionName: {SessionName}, gameAddress: {gameAddress}, gameport: {gameport}");
        // Start or join (depends on gamemode) a session with a specific name
        result = await _runner.StartGame(new StartGameArgs()
        {
          GameMode = mode,
          SessionName = SessionName,
          Scene = scene,
          EnableClientSessionCreation = false,
          SceneManager = gameObject.AddComponent<NetworkSceneManagerDefault>(),
          Address = NetAddress.CreateFromIpPort("0.0.0.0", gameport),
          CustomPublicAddress = NetAddress.CreateFromIpPort(gameAddress, gameport),
          CustomPhotonAppSettings = appSettings,
          MatchmakingMode = MatchmakingMode.FillRoom
        });
      }

      // other logic

    }
    catch (Exception ex)
    {
      Debug.Log(ex);
    }
  }
前面步骤完成后,我们的服务器就完成了注册到 GameLift Servers 和 Photon Cloud 的步骤。
添加玩家到游戏内
这个步骤中,我们需要将客户端登陆游戏服务器,这里唯一识别房间的标记是 sessionName。
客户端入口:CreatePlayerSession 方法
这个方法我们需要去创建 Gamelift Player Session,当它的返回成功后去以 Photon Client Mode 启动客户端链接。
async void CreatePlayerSession(ConnectionState connState)
  {
    try
    {
      var client = new AmazonSecurityTokenServiceClient(awsRegion);
      var request = new AssumeRoleRequest
      {
        RoleArn = "<GameLift-Assumed-Role>",
        RoleSessionName = System.Guid.NewGuid().ToString()
      };
      var response = await client.AssumeRoleAsync(request);
      var gameLiftClient = new AmazonGameLiftClient(response.Credentials, awsRegion);

      var createPlayerSessionRequest = new CreatePlayerSessionRequest
      {
        GameSessionId = connState.gameSessionId,
        PlayerId = connState.playerSessionId
      };
      var result = await gameLiftClient.CreatePlayerSessionAsync(createPlayerSessionRequest);
      if (result.HttpStatusCode == System.Net.HttpStatusCode.OK)
      {
        Debug.Log("Player session created successfully!");
        if (result.PlayerSession != null)
        {
          connState.playerSessionId = result.PlayerSession.PlayerSessionId;
          _photonManager.StartGame(GameMode.Client, connState);
        }
        else
        {
          throw new Exception("Response was OK but player session data is missing!");
        }
      }
      else
      {
        throw new Exception($"Failed to create player session. HTTP Status: {response.HttpStatusCode}");
      }
    }
    catch (Exception ex)
    {
      Debug.LogError($"General error: {ex.Message}");
    }
  }
下面是调用它的方法,我们可以传入自定义的 playerSessionId 以及 gamelift session-id
var playerSessionId = $"benxiwan-{UnityEngine.Random.Range(0, 10000)}";
var gameSessionId = "<gamelift-session-id>";

var connState = new ConnectionState
{
    sessionName = sessionName,
    playerSessionId = playerSessionId,
    gameSessionId = gameSessionId
};

CreatePlayerSession(connState);
同时,可以将自定义生成的 playerSessionId 从 GameLift Servers 传递到 photon cloud,主要用到了 photon sdk 的 connectionToken 这个参数。
  public async void StartGame(GameMode mode, ConnectionState state)
  {
    Debug.Log($"StartGame GameMode: {mode}");

    try
    {
      GameSession gamesession = state.gamesession;
      string SessionName = state.sessionName;
      string gameAddress = state.gameAddress;
      ushort gameport = state.gamePort;

      // other logic
      var appSettings = BuildCustomAppSetting("<photon-region-code>", "<photon-custom-appid>");

      StartGameResult result;
      if (mode == GameMode.Client)
      {
        Debug.Log($"STATE: SessionName: {SessionName}, gameAddress: {gameAddress}, gameport: {gameport}");
        // Start or join (depends on gamemode) a session with a specific name

        result = await _runner.StartGame(new StartGameArgs()
        {
          GameMode = mode,
          SessionName = SessionName,
          Scene = scene,
          EnableClientSessionCreation = false,
          SceneManager = gameObject.AddComponent<NetworkSceneManagerDefault>(),
          CustomPhotonAppSettings = appSettings,
          MatchmakingMode = MatchmakingMode.FillRoom,
          DisableNATPunchthrough = false,
          ConnectionToken = System.Text.Encoding.UTF8.GetBytes(state.playerSessionId)
        });
      }
      else
      {
        // SERVER: get game session info
        // SERVER LOGIC
      }

      // other logic

    }
    catch (Exception ex)
    {
      Debug.Log(ex);
    }
  }
同时我们需要处理 photon sdk 中服务器的回调函数 OnPlayerJoined,当玩家进入房间的时候去激活 GameLift servers 那边的 playersessionid,这样就可以保证它从状态 reserved 设置成 active。
void INetworkRunnerCallbacks.OnPlayerJoined(NetworkRunner runner, PlayerRef player)
  {
    if (runner.IsServer)
    {
      Debug.Log($"Photon OnPlayerJoined playerId: {player.PlayerId}");

      byte[] token = runner.GetPlayerConnectionToken(player);
      var playerSessionId = System.Text.Encoding.UTF8.GetString(token);

      Debug.Log($"GameLift OnPlayerJoined playerId: {playerSessionId}");
      GameLiftServerAPI.AcceptPlayerSession(playerSessionId);
    }
  }
玩家离开会话
这一步我们需要在 photon sdk 的 OnPlayerLeft 方法中清理前面 gamelift servers 生成的 playerSessionId。
  void INetworkRunnerCallbacks.OnPlayerLeft(NetworkRunner runner, PlayerRef player)
  {
    if (runner.IsServer && _spawnedCharacters.TryGetValue(player, out NetworkObject networkObject))
    {
      Debug.Log($"OnPlayerLeft playerId: {player.PlayerId}");
      byte[] token = runner.GetPlayerConnectionToken(player);
      var playerSessionId = System.Text.Encoding.UTF8.GetString(token);
      Debug.Log($"RemovePlayerSession:{playerSessionId}");
      GameLiftServerAPI.RemovePlayerSession(playerSessionId);
    }
  }
关闭游戏会话
这一步中我们可以做一些“扫尾”工作,比如保存玩家的信息,上传日志到 s3 等等。同时,在 photon sdk 的 OnShutDown 方法中去调用 Gamelift Servers 的 ProcessEnding。
以上就是整个 GameLift Servers 和 Photon Cloud 整合后的基本交互流程。整个过程有点挑战,但总体算平稳。
测试
Anywhere (sdk5)
下面展示了一个测试 Anywhere 环境的主要 CLI 步骤
# step 1: create custom location
aws gamelift create-location \
--location-name custom-location-1

# step 2: create fleet
aws gamelift create-fleet \
--name myFleet001 \
--compute-type ANYWHERE \
--locations "Location=custom-location-1"

# step 3: get the fleetid from step 2 and register local compute
aws gamelift register-compute \
--compute-name benxiwanAnywhere001 \
--fleet-id <fleetId Arn> \
--ip-address <public ip address> \
--location custom-location-1

# step 4: generate auth token
aws gamelift get-compute-auth-token \
--fleet-id <fleetId Arn> \
--compute-name benxiwanAnywhere001

# step 5: use the auth token to access gamelift server in Unity
# this auth token is for DS
string authToken = "<auth token>";

# step 6: create game session with game properties
# this gameSessionId is for Client
aws gamelift create-game-session \
--maximum-player-session-count 10 \
--fleet-id <fleetId Arn> \
--game-properties {"Key": "SessionName", "Value": "photonRoom001"} \
--location custom-location-1
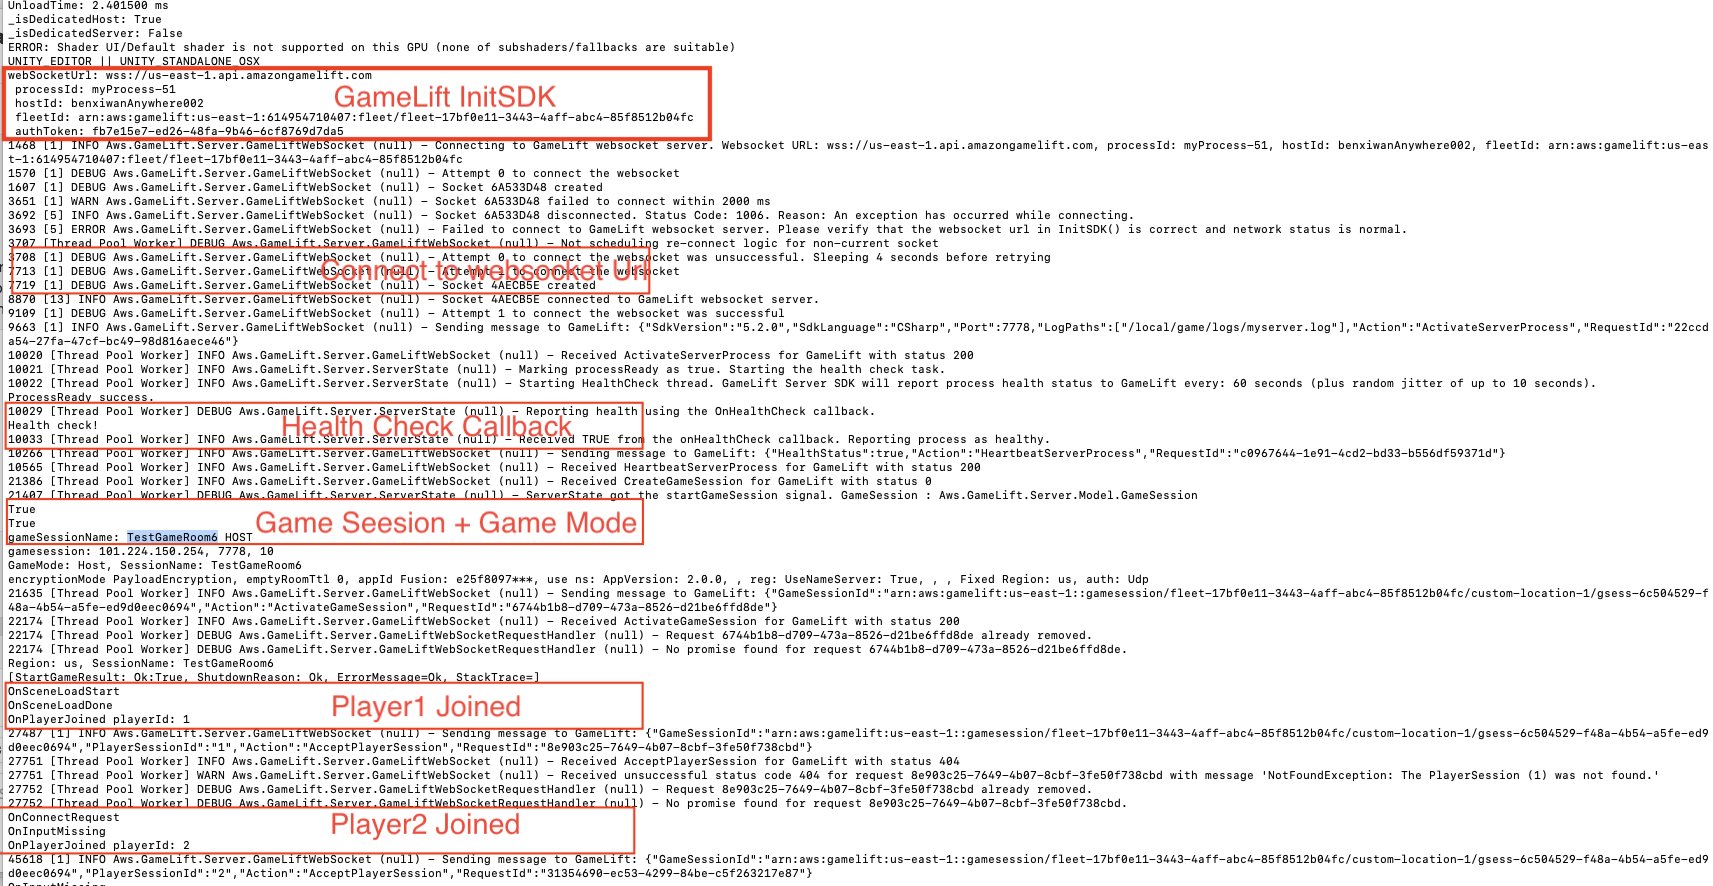
使用 GameLift Anywhere 测试时候的日志输出样例:
Managed EC2
下面展示了一个测试 Manged EC2 环境的主要 CLI 步骤
# step 1: upload build with basic information
aws gamelift upload-build \
--name "unity-photon-v1" \
--build-version "1.8" \
--build-root "./Builds/linux" \
--operating-system AMAZON_LINUX_2 \
--server-sdk-version "5.0.0" \
--region <aws-region-code>

# step 2: create fleet, need build id from previous step
# for port, refer: https://doc.photonengine.com/fusion/current/manual/connection-and-matchmaking/tcp-and-udp-port-numbers
aws gamelift create-fleet \
--name "photon-fleet.v1" \
--build-id <buid id> \
--certificate-configuration 'CertificateType=GENERATED' \
--instance-role-arn '<custom-instance-role>' \
--ec2-instance-type c5.xlarge \
--ec2-inbound-permissions 'FromPort=4530,ToPort=4540,IpRange=0.0.0.0/0,Protocol=TCP' \
--ec2-inbound-permissions 'FromPort=5050,ToPort=5060,IpRange=0.0.0.0/0,Protocol=UDP' \
--ec2-inbound-permissions 'FromPort=27000,ToPort=27010,IpRange=0.0.0.0/0,Protocol=UDP' \
--fleet-type SPOT \
--runtime-configuration 'ServerProcesses=[
{LaunchPath=/local/game/TestServer.x86_64,ConcurrentExecutions=1}
]' \
--region <aws-region-code>

# step 3: create game session, need fleetid from previus step
# this gameSessionId is for Client
aws gamelift create-game-session \
--maximum-player-session-count 10 \
--fleet-id <fleet id arn> \
--game-properties {"Key": "SessionName", "Value": "photonRoom001"} \
--region <aws-region-code>
假设我们的 Game Server 注册的房间名为 photonRoom001,为了保证链接,我们的客户端也需要使用同样的房间名字 photonRoom001。注意:房间名字在 Region 内需要保证唯一。
Tips:
- 保证 GameLift 的 region 和 Phton fusion 的 region 对应,保证响应时间。
- Photon Fusion 的中国区 AppID 需要额外的邮件请求才能激活。
- Fushion 支持 UDP, TCP 以及 websocket 三种协议,会对应不同的默认 port,做安全组的时候需要注意。
- Client 是通过 GameSessionName 来找到对应的 Game Server 的, GameSessionName 是区域级别的资源,创建房间的时候需要保证唯一。
结论
本文通过 GameLift Servers SDK 和 Photon SDK 的集成,解决了基于 Photon Fusion 架构中,通过 GameLift 提供云端托管的高可用性游戏服务器环境。我们同时通过 AWS 和 Photon Fusion 来加速多人游戏的开发流程,提升游戏运营的效率以及可扩展性。通过这次整合,玩家的游戏体验得到了提升,我们可以更灵活高效地应对全球不同地区的网络环境挑战,保证用户的流畅游戏体验。
值得注意的是,除了技术上的兼容,GameLift Servers 上面还有很多优秀的案例,如 Party Animals、APEX Legend、Squid Games 等等,这些可以给游戏厂商带来很多“少走弯路”的经验。
参考链接
系列博客
Amazon GameLift 高阶使用技巧(一)- FlexMatch 多模式匹配的实现
Amazon GameLift 高阶使用技巧(二)- 使用 GameLift Container Fleet 运行 UE5 Dedicated Server
Amazon GameLift 高阶使用技巧(三)- 使用 Amazon GameLift Servers+ Amazon GameLift Streams 托管游戏服,并构建云游戏串流
本篇作者